BLOGGER TEMPLATES AND TWITTER BACKGROUNDS »

August 18, 2011

Tuning in for something a bit different

My family is a family of stuff. My maternal grandparents were borderline hoarders (which side of the border depends on your perspective, and what period of time you spent at which of their houses). There were a themes in their hoarding beyond what things might be of use (including, inexplicably, jars of mercury that I remember sitting in the living room). My grandma was a great collector: of books, Hummels, depression glass . . . and I think I caught her bug. She had a plaque on her wall stating, “I have so many books I want to read, I’ll never die.” Well, I’m certainly carrying on that tradition, and with her trusty knitting needles I’m following along in that hobby as well. Now I’m getting into antiques as well. It started with a few bits of furniture, and is slowly branching out into other areas. I’m keeping a firm handle on it though, keeping to items that I know I will use or repurpose so that they are useable. There may not be any Antiques Roadshows in my future, but I have things that I love and that I use every day, like my desk, and old steamer trunk I use as a storage space and coffee table, a side table (which is an old sewing machine table, with the sewing machine [broken beyond reasonable repair] removed). (I hope to post some pictures of these later – you can sort of see the side table in previous posts.)


The newest edition is an old radio cabinet, which is soon to be the greatest sewing cabinet ever. A random find on Craigslist, the cabinet was a mere $10. I was semi-inspired by the efforts of Jen and John at Epbot with their radio cabinet. Shoot, all of her posts inspire me, and I feel like my brain has been belching out new ideas since I found her blog. My radio would never be steampunk worthy, it’s from the 1930s rather than the Victorian era, but I knew there was potential for another purpose.


Step 1 was picking up the cabinet and doing some serious dusting, once, of course, the cats thoroughly inspected the new interloper.

After recovering from the subsequent allergy attack, step 2 including removing extraneous (and mysterious) bits of wood. Then I carefully took out the old fabric, which was glued to a piece of thick cardboard that was far beyond saving. Before that was thrown away I made a pattern of it on a piece of newspaper.


Step 3 was a bit of thinking. The overall structure of the cabinet was still sound, even at 70+ years old. The wood, although in many places veneer, was pretty decent, just a bit scratched and beaten up. There was almost one shelf in the inside, the remnants of where the radio used to sit. After some talking with my dad, a woodworker, we had a sort-of plan. Add a bottom, maybe a second shelf, and either attach the cabinet to a base and back so it would swing out to be an accessible storage unit, or figure out how to add wheels or slides to the bottom so no back or hinges were needed. The next step for me would be to head to the fabric store to find something to replace the speaker panel.


Next up: Fabric, the workshop of wonder, and getting some new shelves.

June 05, 2011

Commissions

(Note, I’ve had this blog post in progress for almost 2 months! I never meant this to be an every day recording of crafting progress, but I had hoped to post more frequently that once a quarter. I’m just having too much fun crafting!)

My first commissions!


I’ve made a lot of things for other people over the years, and I love passing on a little bit of homemade love to people I know will appreciate it. Friends and relatives ask me if I’ve ever though of opening an Etsy shop, and the honest answer is both yes and no. Yes, I’ve thought about it, but no, I don’t think I’ll ever do it. Right now, as I work full time and knit at home to relax and melt away some of the everyday stress, it’s just not in the cards. I want to keep loving what I do, and I want to be able to have the freedom to randomly make something for a nephew, niece, or friend.


That doesn’t mean, however, that I look gift commissions in the mouth :) A few months ago (and where is this year flying off to again??), in a round-about way, the sister of a friend of a friend (yes, try to say that three times fast) contacted me and asked if I’d ever made one of my stuffed animals to sell. Although I hadn’t, I was open to the idea and we came to an agreement on the project, which eventually developed into two things, and a price. For fellow crafters who sell their wares, you’ll know how hard it is to set a price on a project. It’s not just a matter of material cost but of time – how do you figure out what to fairly (for yourself and the buyer) price something at? A coworker suggested I charge $10 an hour, and I think he was surprised when I couldn’t help but chuckle and tell him that no one would be able to afford the finished product. Most people don’t know how long a seemingly simple thing takes to make. For toys, it’s often not in the knitting but in the stuffing and assembling that time magically gets sucked away. As I usually knit in front of the TV or when I’m talking with friends, I’m considerably less than an efficient knitter. But that’s why I want to continue to knit for fun and not profit – I love the process of creation, the magic that makes an unassuming ball of yarn into something utterly different.

So, the (long-) finished commissions:

Giant Sack Boy

June 14, 2011 557

Pattern: Alan Dart’s Sackboy

Made for: a friend of a friend’s brother-in-law (the sister, his wife, commissioned it for an anniversary present)

Yarn and needles: Paton’s Shetland Chunky in Taupe and my trusty Boye needlemaster needles in (I think) US7s

Changes to pattern: oh, how I wished I had written them all down. My main goal was to get a Sack Boy that was about twice the size of the one produced by the original pattern. For the most part, this called for a straight doubling of stitches and rows. Sometimes it got more complicated, with increases being done on purl rows, and a row being skipped here and there. Since the finished product was going to be so big, I figured a skipped/extra row every here and there wouldn’t make a huge difference – and it didn’t. The only part I had to redo was one arm, because the first pattern I tried for the thumb looked ridiculous (no pictures were taken of the hitchhiker’s thumb from hell). The second try on the thumb was great – I did one extra cast on stitch instead of double the cast on stitches for the thumb.

June 14, 2011 549

The mouth was also a change from the pattern, because something a bit more expressive was requested. I had some felt on hand, so I cut out a half circle in black and sewed it on, and played around with a bit of red until I had something that looked right. The tongue is only sewn on across the back, so it has a bit of movement. (And Portia must always check out everything that moves – especially if it involves yarn!)

June 14, 2011 559

The internal stabilization was important for this Sack Boy, because of the size. If nothing was inside to keep the head straight, it would have flopped over like crazy. Straws wouldn’t cut it, and I was afraid that a wooden dowel wouldn’t put up to prolonged stress – and if it broke, splinters might poke through the stuffing and “skin.” My dad had the perfect solution, an old aluminum arrow. The head and fletchings had long ago disappeared; and after the arrow was broken in half, with the sharper ends bent over and taped, I had a perfect backbone. Light, strong, and slim.

next, The Crowning Achievement

P2103557

Pattern: Princess Hat

Made for: same guy, this time as a Valentine’s Day gift

Yarn and needles: Caron Simply Soft in dark country blue, and Hobby Lobby’s I Love This Cotton in Buttercup; needles – my favorite, the Boye needlemaster US 5 and 6.

Modifications: Detailed on Ravelry (link is accessible to non-Ravelers). One of the easiest modifications I’ve done. It was just a matter of carrying over the written mods from the smaller sizes – adding a few extras rows and stitches increases where called for. The finished hat was 24” around, and although I carefully double checked on the size requested (men’s 7 3/4 size) and exact measurements of that (24 1/2”), it was a bit big. C’est la vie.

February 17, 2011

Hats fit for royalty!

I’m once again catching up with finished projects. With a recent, much-needed upgrade of my computer to Windows 7 (Goodbye Vista! Won’t miss ya!), I’m hoping to update more frequently. To start out with, the oh-so-fun hats for my nephews and niece:

PC243358

and with a little help from Chris Moose:

PC243351

These hats, once I got over my unfortunate rookie mistake of misreading the needle requirements, were very quick and easy. To give the chainmail portion a bit of sparkle, but to keep it soft, I held together two yarns: Lion Brand Vanna’s Glamour (which has a silvery, sparkly strand woven in), and Caron Simply Soft. The i-cord crowns were an addition, to individualize the hats with I. and J.’s favorite colors and to help keep them separate but equal. I didn’t necessarily know what I was doing with the crown shaping at the beginning, and I started off just trying to make sure I had plenty of i-cord to work with (long enough to wrap around the hat twice, plus a little bit). Then I played around with pins for a bit:

PC223330

The pins got to be a bit of a pain, quite literally, so I ended up eyeballing it. The main trick was keeping a consistent number of rows and stitches in the crenellations, and sewing enough of the key points on to keep it mostly kid-roughhousing proof.

For the little siblings were corresponding prince and princess hats, made with some of my favorite cotton yarn (at least for softness): Hobby Lobby’s I Love This Cotton.

PC243344PC243342

PC243347

To make this similarly separate but equal, both hats use the Princess Crown pattern. For the more masculine version (i.e., no picot edge on the hat band), these mods were done:

rounds 4-5 knit
round 6 purl
rounds 7-8 knit
round 9 purl
rounds 10-14 were knit

All four hats were complete successes. I.’s face, when he first opened his book and hat, was priceless! We ended up having a small regiment running around the house for a while, and some persuasion had to be employed to get a few family pictures without the hats. : )

Up next: a fun crafty exchange gift, another belated Christmas FO, and getting my first knitting commissions!

January 03, 2011

I love being an aunt

I love being an aunt. I have four nephews and one niece, and they are all amazing. A few weeks ago I was talking on the phone with my middle brother about Christmas ideas for his four kids. Their family has started using an online wishlist, to help keep all the ideas together, so I was going over some of those ideas with him. In the background I suddenly heard his oldest boy pipe up with “but doesn’t she usually make us something?” I have to confess my heart melted more than a bit at that. Six can be a hard age to please sometimes, and I love that he looks forward to things that I make for him. He and his siblings are the main recipients for the toys and fun little things that I make, and it’s a perfect excuse for me to be like a kid again and play with those toys!!

It’s been so long since I’ve posted that I lost track of the projects that I’ve finished in the meantime. For a while I was in a writing funk, but was the complete opposite with yarn. So without further ado, the beginning of FO parade.

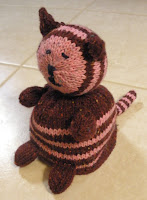
The twins – my youngest nephew and niece – are lucky they’re adorable, because I almost kept their birthday gifts for myself. For my last birthday I got Susan B. Anderson’s Itty-Bitty Toys, a fantastic book and one that will have a permanent place on my bookshelf. I had already made the bunny for my friend’s daughter, so I knew how easily the patterns flowed – I really like how Anderson constructs her toys as they go, it makes the final bits of assembly and finishing so much easier. The bunny was one of the few patterns I’ve done where I didn’t really change anything, or have to rewrite anything to make it easier on my poor literal brain.

For the second birthday of the indomitable E & E I decided to make a go at the reversible toys, and they turned out to be a ridiculous amount of fun. Don’t get me wrong – the little fiddly bits like the mouse feet and nose, and the turtle’s spots were kind of a pain, because they were so small. But the final assembly was like magic. It turned a mass of turtle spots and wiggly frog legs into something that made me giggle like a little kid. I finished what I dubbed the Furtle or Turog at work during my lunch break and promptly had to show it off to my coworkers – one of whom almost stole it from me! The pictures do not do this toy justice – they can’t show how fun it is to turn it inside out, revealing the hidden toy.

Start to finish the Furtle took barely any time at all. I worked on it a couple of hours a night, and during some lunches, and had both the Furtle and Cat/Mouse done in a week. [One recommendation to help with turtle spots – do pin them all on before sewing. That helps a lot with getting the proper spacing.] The reaction from E & E was everything I could have hoped for too. My nephew immediately found the turtle side and proudly walked around with the “tuh-tle” the rest of the night. His sister greeted Cat/Mouse with the cutest little “meow” and had great fun trying to switch them back and forth – for a two year old that does require quite a bit of concentration and maybe some help with coordination for the switchover.

But back to Christmas . . .

After overhearing my nephew, I took a look at their online lists to try and find some inspiration, thinking maybe I could find some kind of fun hat or small toy or something to go along with something from the list. Coming from a medieval history and literature background, as soon as I spotted The Knight and the Dragon and The Story of Sir Launcelot and His Companions on the lists of the two oldest boys, I was sold. A quick search of Ravelry found me a perfect companion – chainmail hats (available originally here)! In a perfect twist of fate, as I was telling my brother about this, he told me that the oldest had been wondering if I could make a chainmail hat for them! In order to help distinguish the two hats, I’m going to do a mess of i-cord and sew the outline of a crown around the top of the hats, red for I., and blue for J. For the twins, so the boys hats don’t get immediately stolen, are coordinating princess and prince hats. The princess one is nearly done (I just have to sew the hat bad down), and the prince one is begun.

Pictures will come next time (and there won't be a 3 month wait, I promise!).